- Edyta
- Apr 5, 2023
- 3 min read
I am SEW glad you are joining us for our

Welcome to Week 3. If you are just joining us, click here for more information on this fun event.
Today, we will be making Whole, Half, and Quarter Cornerstone Stars along with Sashing for the quilt.

For this project, I chose our Primrose Fat Quarter, Star Upon Stars Template Set,
Scrappy Lights Fat Eighth Bundle, and Scrappy Darks Fat Eighth Bundle (or you can use scraps from your own stash), Aurifil Thread – 2370 or 2325, Rotary, Creative Grids® Ruler, Fabric Pencil and Best Press.
Edyta's Tip: I strongly advise starching your fabrics before you begin. I love how well the Best Press spray works!

Cutting directions for this project can be found in our Star Upon Stars Pattern
or in our book, Patches of Stars.
Edyta's Tip: I cut my strips using my 4½" x 12½" Creative Grids Ruler then use my acrylic
Star Upon Stars Template Set. It is so quick and easy to cut pieces for my stars!
When starting this project, I think it is best to do one block at a time.
Whole, Half, and Quarter Cornerstone Star
Start by making just 1 Star to learn the technique.
Refer back to Week 1 Blog for additional guidance building stars.

(Please note: My fabric colors may vary in step-by-step photos.
I am using my scraps to share the technique with you.)
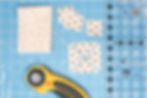
Select your fabrics. For one block, I selected:
Dark scraps and Light scraps. This is a perfect time to use your leftover peices!
From 1⅛" x 21" strip, trim the left end of the strip at a 45-degree angle. Place 1⅛" line on the ruler along
the just-cut angled edge to subcut 12 diamonds from each strip.
Edyta's Tip: For my cornerstone stars, I like the diamonds to match for some of the blocks, but for some of the blocks, I like them scrappy. With that in mind, I recommend you create all the matching stars first,
then scrappy ones, and then use leftovers for Half Stars and Quarter Stars.

To make a cornerstone star, gather eight diamonds.

Place two right sides together, pin and sew.

Sew into sets of four.

Trim "bunny ears".

Press seam in one direction. Then sew two halves together.

Cut 4 QSTs and 4 background squares for one Cornerstone Star.

Use your templates to mark 1/4" points.

Arrange your QST on your Star, then sew.

Press seams towards stars. Then set in background squares.
Use the techniques you learned in Week 1 to assemble your stars.

Press and trim your Cornerstone Stars.
Cornerstone Star's unfinished block should be 3½" x 3½".

Keep going! I am so proud of you.
Make 15 Whole Cornerstone Stars.
11 Half Cornerstone Stars.
2 Quarter Cornerstone Stars.
Sashing
Start by making just 1 Sashing Strip to learn the technique.
Edyta's Note: When sewing your sashing, please use a scant 1/4" seam allowance. I recommended
making one sashing strip as a practice to ensure when trimmed it measures 3½" x 12½".

(Please note: My fabric colors may vary in step-by-step photos.
I am using my scraps to share the technique with you.)
Select your fabrics. For my Sashing Strips, I selected:
Pink, Brown/Blue and Light Fat Eighths
Edyta's Tip: Once you finish cutting your strips, place all your leftover fabrics back into your stash so you can incorporate these pieces into future sashing strips. This will help tie everything together.

To make one sashing strip, gather two 1¾" x 21" light strips, two 1½" x 21" dark strips,
and one 1½" x 21" accent strip. Join the strips in the order shown above to make a sashing strip set.
Cut 1½" sections
Edyta's Tip: Please remember use a scant 1/4" seam allowance,
when joining the sashing segments together.

Arrange your pieces.

Take one segment apart as shown above.

Position on each side and sew all units together.


Align the 1¾" ruler line with center of the accent squares. Trim top and bottom as shown.
Trim sashing strip to 3½" x 12½".

Repeat to make 42 sashing strips total.
Watch our YouTube video for more details on how to put your quilt together, and join us LIVE on Friday, April 21st at 11am PST if you have questions.
Look at you shine!
I am SEW proud of your hard work - keep going!

Can't wait to see your finished quilts!
Make sure to use the hashtags #staruponstarsquilt #laundrybasketquilts on social media!
Happy Quilting!
Edyta