top of page

BLOG

Updated: Jul 21, 2022

Welcome to the Finishing Touches for our Mystery 2022 quilt!

Are you ready to see this beauty put together? I am SEW excited!

ree

Prepare for landing- our destination quilt is in view👀

Just a few more steps before we can relax and take in all the gorgeous work we've done

these past few weeks. I am so impressed with you - you rocked this mystery quilt!


Below are the last few steps,

before our mystery quilt is revealed!

ree

Join our LIVE show on March 30th, as I guide you through the finishing touches and reveal our Mystery 2022 quilt....


Just like we have done our blocks one at a time, we are going to

create 8 wedge units for our quilt top, one at a time.

ree

4 Block 10As 4 Block 10Bs


Arrange all of your blocks in the correct places following the line up above.

We will be using 4 Block 10As and 4 Block 10Bs for the bottom row.

These will create your center star!

ree

First sew your blocks into rows.

Then sew each row together. I pressed my seams open between all of the blocks.

ree

Now you will have 8 full wedge units.


ree

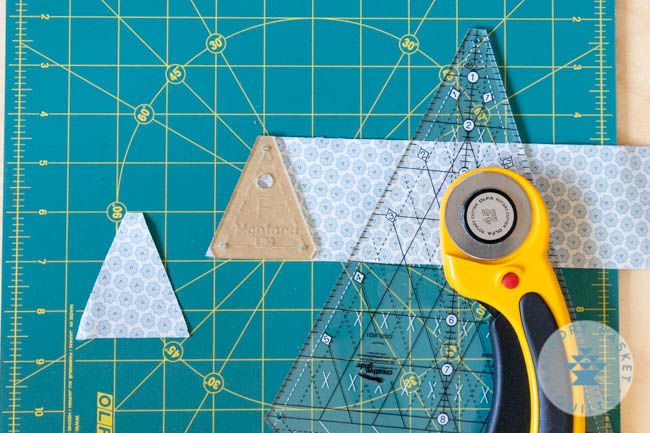
From fabric A-9848-LB, cut 2 squares 18-1/2" x 18-1/2". Then cut once diagonally to create 4 half-square triangles (wait to watch our LIVE video for tips on fussy cutting this beautiful fabric).

ree

Pin and sew 18-1/2" HSTs to the top of our wedge units with Block 10B at the bottom (light blue diamond), as shown above. Push seam allowances towards the HST.

These will be your Corner Wedge units.

Edyta's Tip: I used a LOT of pins to put these units together.

This allowed me to be accurate in matching points.

ree

Pin and sew 1 Wedge unit and 1 Corner Wedge unit.

Press seam open.

ree

Repeat for a total of 4 Quarter units of the quilt top.

Arrange 2 Quarter Units to make half of the quilt. Pin and sew then press seams open.

ree

Now pin and sew together the two halves of your quilt top!

ree

Isn't this just stunning? Look at the incredible work you did in just a few weeks!

Your quilt top should be 60 1/2" x 60 1/2"

ree

Now if you would like to, you can add a border to your quilt to make it bigger. I used the same star fabric (A-9848-LB) for my quilt. I cut 4 strips, 5 1/2" by the length of the remaining fabric, one for each side of the quilt. I centered the strips on the edge of my quilt center, then pinned and sewed it to the top and bottom of my quilt. I then repeated these steps for the left and right sides.


BACKING, QUILTING & BINDING

ree

Your backing, quilting and binding are the last of our finishing touches. For my backing, I used the Bluebird Hexagon fabric (A-9849-B). You can also use A-9848-B for your backing to compliment your quilt top.

I layered my quilt with backing, batting and the quilt top and I quilt it on a longarm machine with an edge to edge design, called Seaweed.


For my binding, I cut 2-1/2" x WOF strips of Bluebird fabric A-9845-B to finished the edge of the quilt,


We are so happy you have joined us for our Mystery Quilt 2022 and don't miss the LIVE show on March 30th


Happy Quilting!

Edyta


Updated: Jul 21, 2022

Welcome to Block 12 of our Mystery Quilt 2022!

I am so thankful to be quilting with you. You have been so kind and have been a ray of sunshine to me for the past few weeks.

ree

Below is all the information you need to prepare before joining

For Block 12, you will need:

• 1 light fabric

• 1 blue fabric

• 1 light fabric


ree


Block 12


We will be making 16 total Block 12s.


Cutting Directions:

ree

Begin by cutting strips:

• Blue fabric - 2 strips 3½" x 20"

• Light fabric - 4 strips 3½" x 20"

• Light fabric - 2 strips 3½" x 20"


ree

Align your ruler or template B and cut using your skills from Block 3 and Block 9.


From one strip of fabric, you should be able to get 8 pieces.

Blue fabric - 16 pieces total (2 strips)

Light fabric - 32 pieces total (4 strips)

Light fabric - 16 pieces total (2 strips)


Block Finishing

Edyta's Tip: Keep your ruler or templates handy after cutting.

They are the perfect tool to help you precisely mark your sewing points.

ree

First mark your 1/4" sewing points then arrange your pieces with light pieces on top,

a blue piece in the middle, and a light piece on the bottom.

ree

Position the blue piece over the bottom light fabric piece right sides together.

Pin and sew.

ree

Press your seam open.

ree

Place the light piece over the unit right sides together.

Pin, sew and press.

ree

Position and sew second light piece as shown above.

Sew and press.

ree

Use your template A or ruler to trim.


16 Block 12s


ree

Our Block 12s will be positioned as shown above in our Mystery Quilt 2022 grid.

ree

Thank you for quilting with me!

Please join me for our special LIVE show this Wednesday, March 30th for the big reveal of our mystery quilt and a final step-by-step on how to assemble your blocks into a quilt. We will also follow up with a final blog (Monday, March 28th) to share with you all the information to finish your beautiful project and more.


Happy Quilting!

Edyta


Please remember to share your progress photos to Instagram and Facebook!


Updated: Jul 21, 2022

Welcome to Block 11 of our Mystery Quilt 2022!

What a fun time we're having- it's like playing in a sandbox!

ree

Below is all the information you need to prepare before joining

For Block 11, you will need:

• 1 light fabric

• 1 blue fabric

• 1 light fabric


ree


Block 11


We will be making 8 total Block 11s.


Cutting Directions:

Begin by cutting strips:

• Light fabric - 2 strips 2" x 20"

1 strip 2" x 10"

1 strip 2½" x 20" (set aside the 2½" strip until later)

• Blue fabric - 2 strips 2" x 20"

1 strip 2" x 10"

• Light fabric - 1 strip 2" x 20"

1 strip 2" x 10"


Arrange 2" strips to prepare to sew strip panels.

You will need 1½ strip panels from each color option as shown above.

Sew strips together. Press seams in one direction.


ree

Align your ruler as shown above.

Trim the edge following 45 degrees as shown above.

ree

Position your ruler, measure 2" width and cut.

ree

Out of 1 panel, you should be able to get 7 units.

Cut 1½ panels for a total of 8 units.

Now align your ruler on the smaller strip panel,

and repeat the steps above to cut 8 units.

Alternative way of cutting with the Mystery Templates E and D:

Align your Template D. Cut using your rotary.

Shift your Template D, measure again, and cut.

Out of 1 panel, you should be able to get 7 units.

Cut 1½ panels for a total of 8 units.

If you would like, you can also use your template to trim the bottom of the templates.

You can also trim them all together in the end after piecing all units together.

Now align your Template E as shown above on the second smaller strip panel, and repeat the steps above to cut 8 units.

If you would like, you can also use your template to trim the bottom of the templates.

You can also trim them all together in the end after piecing all units together.


ree

Now take your 2½" light strip you set aside before and align your ruler or Template F

on the strip and cut for a total of 8 light pieces.


Block Finishing

Edyta's Tip: Keep your ruler or templates handy after cutting.

They are the perfect tool to help you precisely mark your sewing points.

ree

Arrange all units as shown above.

Please remember to watch our Block 11 video for additional tips.

ree

Position the smallest light piece on top of the small unit right sides together as shown above.

Pin, sew, and press.

ree

Place this unit over the larger strip panel right sides together.

Pin, sew, and press.

ree

Use your template A or ruler to trim.

If you have not trimmed your bottom points, this would be the time to do it.

Pay attention that you stay 1/4" away from the bottom points.


8 Block 11s


ree

Our Block 11s will be positioned as shown above in our Mystery Quilt 2022 grid.

We're almost there! One more block to go!


Happy Quilting!

Edyta


Please remember to share your progress photos to Instagram and Facebook!


bottom of page