top of page

BLOG

Updated: Jul 14, 2022

Hello Friends!

I'm happy to report, it's time to add

a little pop of color to our Summer Mystery Quilt!

ree
ree

For Block 7, you will need:

(These notions are just my recommendations)

• Fabrics (1 dark fabric, 1 accent fabric, and 1 light background)

• Aurifil Thread – 2370 recommended

• Olfa Rotary and Blades

Edyta’s Tip: Always have a stash of fresh blades for your rotary and remember to change yours often. for the cleanest cuts.


ree


We will be making 12 total Block 7s.


ree

Begin by cutting from 1 dark, 1 accent, and 1 light background fabric:

• 1 Light Background Fabric - 12 squares 4¼" x 4¼" and 48 squares 2" x 2"

• 1 Accent Fabric - 48 squares 2⅜" x 2⅜"

• 1 Dark Fabric - 12 center squares 3½" x 3½"


• 1 Light Background Fabric - 12 squares 5¾" x 5¾" and 48 squares 2¾" x 2¾"

• 1 Accent Fabric - 48 squares 3⅛" x 3⅛"

• 1 Dark Fabric - 12 center squares 5" x 5"

ree

For 1 block, select 1 dark center square, 4 accent squares,

4 light background squares (2" x 2"), and 1 light background square (4¼" x 4¼") as shown above.


Place two accent squares (2⅜" x 2⅜") on opposite corners of the 4¼" x 4¼" light background square, right sides together.


For 9" finished block, place two accent squares (3⅛" x 3⅛") on opposite corners of the 5¾" x 5¾" light background square, right sides together.

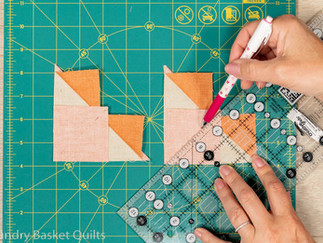
Draw a diagonal line across your unit using your fabric pencil and a ruler.

Sew 1/4" away on both sides of diagonal line.

Cut along the line to create two units.

Press units open.


Place your next two accent squares on each open unit, as shown.

Align your ruler on the square and draw a diagonal line.

Sew on each side on the line, then cut on the line.

Repeat steps for both units.

Open all 4 units, pressing towards the accent fabric.

You have just created 4 flying geese units.

Please trim your flying geese to 2" x 3½".


For 9" finished block, please trim your flying geese to 2¾" x 5".


ree

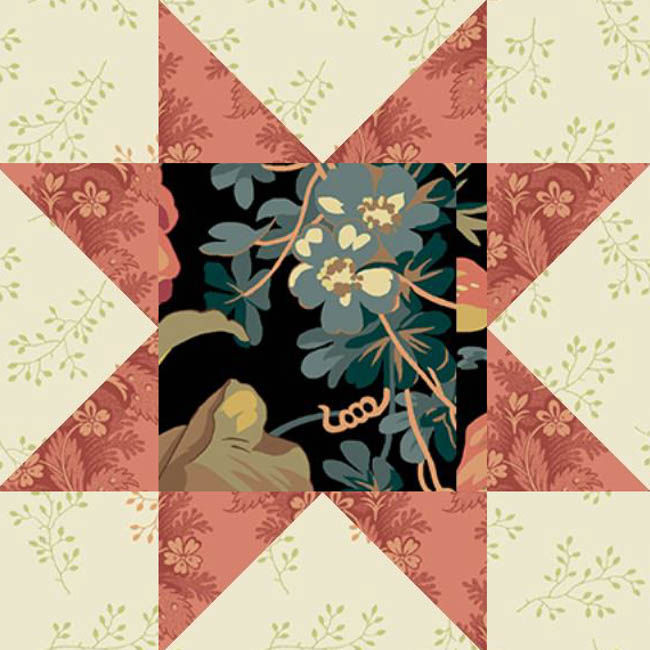
Now arrange your 4 flying geese around the dark center square with a 2" x 2" light background square in each corner to create a Sawtooth Star block.

Pin and sew into rows.

Sew rows together.

ree

Press seam allowances open. Trim to 6½" x 6½" unfinished.


For 9" finished block, trim to 9½" x 9½" unfinished.

ree

Repeat steps for a total of 12 Block 7s.


ree

Our Block 7s will be positioned as shown above in our Summer Mystery Quilt 2022 grid.


ree


ree


ree


ree


ree


ree


ree


These are just a few of our fabric options- I can't wait to see what you create!


Happy Quilting!

Edyta


Please remember to share your progress photos to Instagram, Pinterest, and Facebook!


Welcome back to our

Are you ready to spread your wings and try new things?

ree
ree

For Block 6, you will need:

(These notions are just my recommendations)

• Fabrics (2 dark and 1 light background)

• Aurifil Thread – 2370 recommended

• Olfa Rotary and Blades

Edyta’s Tip: Always have a stash of fresh blades for your rotary and remember to change it often for the cleanest cuts.

Block 6A Left Block 6A Right Block 6B Left Block 6B Right


We will be making 16 total Block 6s.

4 Blocks 6A Left, 4 Blocks 6A Right, 4 Blocks 6B Left, 4 Blocks 6B Right.


ree

Begin by cutting from 2 dark fabrics and 1 light fabric:

• Dark Blue Fabric - 4 squares 9½" x 9½"

• Light Background Fabric - 8 squares 9½" x 9½"

• Dark Brown Fabric - 4 squares 9½" x 9½"


• Dark Blue Fabric - 4 squares 12½" x 12½"

• Light Background Fabric - 8 squares 12½" x 12½"

• Dark Brown Fabric - 4 squares 12½" x 12½"

Take a dark blue fabric square and a light background fabric square and place them right sides together.

Keep the light fabric on the top, and with a fabric pencil, draw a diagonal line.

Sew on each side of the line staying 1/4" away from it.

Finish by cutting on the line to create 2 Half Square Triangles (HSTs).

Press towards dark fabric and trim your 8 HSTs to 9".

Separate your HSTs into 2 sets of 4 as shown above.

(1 set is for Block 6A Left and 1 set for the Block 6A Right)


For a 9" block, Trim your HSTs to 12".

Separate your HSTs into 2 sets of 4.

(1 set is for Block 6A Left and 1 set for the Block 6A Right)


We will be working with first 4 HSTs. Work on each HST individually.

Position your HST as shown in the picture above. Then section into six 1½" strips.


For 9" finished block, position your HST as shown in the picture above. Then section into six 2" strips.

ree

Each strip will be trimmed as shown in the picture above for both the 6" block and 9" block.


Put a little magic spin on your block by rotating all your strips.

Your strips should now look like the image above on the right.

Set them to the side while you cut the remaining set of HSTs to create 4 Blocks 6A Right.


Select and position your HST as shown above, then section into six 1½" strips.


For 9" finished block, position your HST as shown in the picture above. Then section into six 2" strips.


ree

Each strip will be trimmed as shown in the picture above for both the 6" block and 9" block.


Now don't forget the magic spin!

ree

Use fabric markers to keep your Block 6A sets organized while you cut 6B Left and Right.


Follow the same steps above with the dark brown and light fabric for Blocks 6B Left and Right.

(Browse the slide show for a quick guide or check out our Block 6 video HERE)


ree

I'm SEW excited, lets SEW!

Arrange your strips for 1 block.

ree

Place strips right sides together and pin.

Sew into sets of two strips.

ree

Sew into full block.

Press seam allowances towards dark and trim to 6½" x 6½".


For 9" finished block, press seam allowances towards dark and trim to 9½" x 9½".


ree

Repeat to make a total of 4 Blocks 6A Left and 4 Blocks 6A Right.

ree

Repeat to make a total of 4 Blocks 6B Left and 4 Blocks 6B Right.


ree

Our Blocks 6A Left and Right and Blocks 6B Left and Right will be positioned

as shown above in our Summer Mystery Quilt 2022 grid.


ree


(To make a scrappy option for this block,

you need to create a variety of triangles and mix and match the pieces or use big print fabrics.)


These are just a few of our fabric options- I can't wait to see what you create!

Visit our website for more stunning options.


Did you notice we have added more bundles for this awesome project?

In case you just joined us or are looking for a little extra color, these kits are perfect for you!

Happy Quilting!

Edyta


Please remember to share your progress photos to Instagram and Facebook!


A big

Thank You

to everyone who has joined me on

this Summer Mystery Quilting adventure so far!

ree

Oliver is SEW proud

of your hard work!


The interest in this project

has been overwhelming.

Many of you have reached out and

requested some more of our bundles

for this wonderful quilt!


So Oliver and I have a little surprise. . .


We got quickly to work

(Oliver mostly watched me..)

ordering and picking some beautiful fabrics to match our Mystery Summer Bundles to

create Mystery Summer II Bundles.


I can't wait to show you what we came up with!


ree

Your favorite Day Trip Bundle remains the same as the original bundle for our Summer Mystery Quilt

that I show on our Blog and YouTube Channel and will be available to ship July 11th.


Thank you so much for being patient and signing up for the bundles!


ree


is sew cute and almost

exactly as the original one.

ree


ree

We made a few adjustments, but the flavor is still so deliciously yummy!

ree


ree

You will be so happy how close

we were able to match this one!

ree

There is one big change for our Summer II Bundles:

These bundles do not include the light background fabric.

This of course is reflected in the price of the bundles.

Many of you have your own lights that you want to use for this beautiful quilt,

and for some of you that are still looking for some gorgeous lights,

we recommend these amazing options below:

ree


(It would be a little bit more

scrappy, but SEW beautiful!)


ree


(Light and fresh)


You can still join us on the Blog and on our YouTube Channel

for step by step instructions for each block.

You'll be caught up in no time!


It's really amazing that we are all quilting together each week.

I love that we are all working on the same blocks at the same time

but in different places all over the world. How special is that?!


I am having SEW much FUN and hope you are too!


Happy Quilting!

Edyta


bottom of page