top of page

BLOG

Updated: Jun 23, 2021

Welcome back for the fourth week of our Alaska Rainbow Quilt Along.

Now that we’re a month into our Quilt Along, lets take it easy by choosing two blocks similar

to the ones we’ve done and review all that we’ve learned. Check out last week’s blog for anything you might have missed.

This week we will be working on Blocks 5 and 11.

Go ahead and grab all your supplies – Alaska Rainbow Pattern, Alaska Templates, rotary,

ruler, fabric pencil, and Aurifil thread 2310 – and lets begin!

Block 5 – We will make a total of 4 Block 5’s.

Begin by arranging your cut pieces to form the block. This block is just like our Block 2– check back with Week 2’s blog to get more details.

Assemble one Diamond A and two Half-Diamond Bs. Mark both Half-Diamonds. Pin and sew the first Half-Diamond B to Diamond A.

Press seams open before sewing on the other Half-Diamond. Repeat these steps for the remaining 3 Diamond wedges.

For Block 5 corner units, mark, pin, and sew Triangle D to Wedge C. Repeat 3 more times to make all four corners and assemble to form the block.

EDYTA TIP: Use your Creative Grids ruler and Olfa rotary to square off each of the units creating perfect 90o right angles.

Pin, sew, press and trim.

Repeat 3 times to make a total of four Block 5’s.

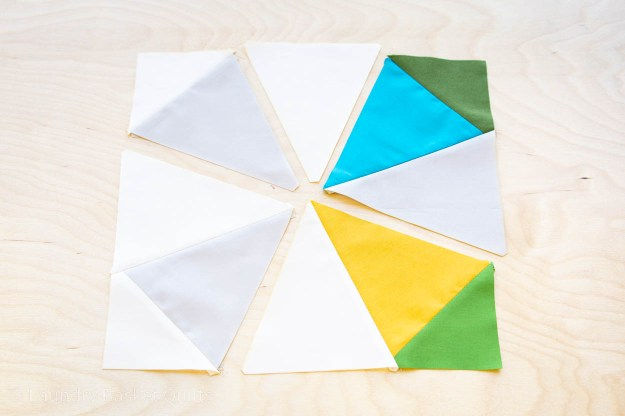
Block 11 – We will be making a total of four Block 11’s. Arrange all your fabric as shown above.

Start by marking Triangle D for Wedge C. Pin marked points before sewing and pressing seams open. Repeat until you have all four corners units.

Now pin additional Wedge C’s to each corner unit, sew and press seams open.

Use your Creative Grids ruler and Olfa rotary to square off each of the units for perfect 90o right angles.

Pin, sew, press and trim.

Repeat 3 more times for a total of four Block 11’s.

On to the scrappy Alaska Rainbow quilt…

Scrappy Block 5Cut your fabric using the Alaska Templates and arrange them as shown above. Continue the steps to mark, pin, sew, and press as directed.

Repeat this exact color arrangement 3 more times to make four Block 5’s.

Scrappy Block 11Cut your fabric using the Alaska Templates and arrange them

as shown above. Follow steps to complete all four Block 11’s. Repeat this exact color arrangement 3 more times for all four Block 11’s.

If you’re just joining us and looking for a beautiful kit, we have some lovely new options.


We love seeing how each and every one of you’re doing with your Alaska Rainbow blocks! Please make sure to tag us in your progress pictures along the way at #alaskarainbowquiltalong

Happy Quilting! Edyta

Updated: Jun 23, 2021

Welcome back for the third week of our Alaska Rainbow Quilt Along. I’m so happy to be quilting with you all each week!

Don’t “fall” behind — check out last week’s blog to see what you might’ve missed or to refresh yourself with our newly acquired technical skills. Keep up the hard work, I think everyone is doing great!

Please don’t forget to send us or post your progress pictures along the way. We really love seeing how each and every one of you are doing with your Alaska Rainbow blocks!

This week we will be working on Blocks 4 and 8.

Block 4 – We will make a total of 4 Block 4’s. Begin by arranging your cut pieces to form the block. This block has two new shapes, so lets start here.

Combine one Diamond A, two Half-Diamond B’s, and one Triangle D using all the techniques you have learned thus far:

Start by marking one Half-Diamond B before pinning and sewing it to Diamond A. Now do the same to the second Half-Diamond B. Press seams open.

Now mark, pin, and sew Triangle D on top to complete your first corner.

Note: Press seam allowance towards Triangle D.

Repeat the above steps 3 more times to complete all four corner units following the pattern’s listed colors.

For your wedge units, use the same methods learned last week and continue to master your quilting abilities.

Repeat 3 more times until you have a total of four wedge units.

Assemble your sewn units into the block once again. Pin and sew each unit following the basic kaleidoscope skills we learned last week.

Now your block should be in 4 separate units.

Edyta’s Tip: Square off your units before sewing the block together allows for you to achieve nice, flat square block.


Most of the questions and concerns that we have received from the last two weeks has been

“How can I get my block to lay flat? Is there a way to square things up?”


The best way to check your unit to make sure that it’s 90° is by placing your ruler right over the unit. Match the 45° line with the center seam, and check that everything aligns.

If needed, use your Creative Grids ruler and Olfa rotary, square off each of the units for perfect 90° right angles.

Pin and sew 2 halves together before pinning again to sew the remaining halves together to complete the block.

Press and trim. Repeat this whole process 3 more times for a total of four Block 4’s.

This block arrangement is the most difficult one that you will have to do. I am so proud of you! Lets reward ourselves with a simple one.

Block 8 – We will be making a total of four Block 8’s. Arrange all your fabric as shown above.

Start by marking two Wedge C’s and one Triangle D.

Pin Triangle D to Wedge C at the marked points before sewing. Press seams open before adding the next Wedge C.

Repeat this process 3 more times to make all four corners of the block following the pattern’s listed colors.

Combine the units so that you have two halves of a block. Line up the halves and pin together.

Sew and press seams open to complete your block.

Repeat these steps 3 more times to finish all four Block 8’s.

I think scrappy and happy rhyme for a reason. I am always happy when I get to play scraps!

Scrappy Block 4Cut your fabric using the Alaska Templates and arrange them

as shown above. Continue to follow the same steps of marking, pinning, sewing,

and pressing as directed in the pattern for Block 4.

Repeat this exact color arrangement 3 more times to make four Block 4’s.

Scrappy Block 8Cut and arrange your pieces as shown then follow the steps above to complete Block 8. Repeat this exact color arrangement 3 more times for all four Block 8’s.


Keep finding Rainbows no matter where you are!


Happy Quilting! Edyta

Updated: Jun 23, 2021

Welcome back for the second week of our Alaska Rainbow Quilt Along!

I am beyond thankful for all of you who’ve joined in so far, and if you haven’t yet – why wait – check out last week’s blog to see what you missed and jump right in, you’ll catch up in no time. We’ve already learned so much with our first 2 blocks, I’m so proud of everyone. The #1 lesson from last week is how important it is to have a nice, accurate, quarter inch seam allowance.

You must keep it consistent from the beginning to the end of the seam.

This week we will be working on Blocks 2 and 9, so grab your Alaska Rainbow PatternAlaska Templates, rotary, ruler, fabric pencil, and Aurifil thread 2310 – let’s get to it!

Block 2 – we will need to make a total of 4 Block 2’s. Let’s begin by arranging pieces to form the block. This block has two new shapes compared to the blocks we made last week. We’ll start with those.

Assemble the new pieces – one Diamond A and two Half-Diamond B’s.

Mark both Half-Diamond B cuts. Edyta’s Tip: I like to keep my templates and pencil close by to mark the fabric so that I can correctly position them for pinning.

Once marked and pinned, sew the first Half-Diamond B to Diamond A. Press seams open before moving on to the other Half-Diamond.

This is how the finished unit will look.

Don’t forget to open your seams instead of pushing them all in the same direction. Repeat steps for the remaining 3 Diamond wedges.

For Block 2’s corner units, mark, pin, and sew Triangle D to Wedge C like last week. Repeat this step 3 more times to make all four corners of the block.

Arrange your sewn units to form the whole block.

Sew units following the basic kaleidoscope skills we learned last week.

Pin and sew into 2 halves before pinning again to sew the halves together to complete the block. Press and trim. Repeat this whole process 3 more times for a total of four Block 2’s.

Block 9 – We will be making a total of four Block 9’s. Arrange all your fabric as shown above. Now I know this one looks familiar, as it should after last week, but don’t be fooled— this is indeed a new block! Notice how the block’s colors are reversed.

Start by selecting two Wedge C’s and one Triangle D. Now using your pencil and template, mark Triangle D.

Pin Triangle D to Wedge C at the marked points before sewing. Press seams open before adding the next Wedge C.

Repeat this process 3 more times to make all four corners of the block.

Combine the units so that you have two halves of a block.

Line up the halves and pin them together before sewing.

Press seams open to complete your block. Repeat steps 3 more times to finish all four Block 9’s.

Now lets spill some adorable fabrics into our scrappy blocks! I’m so excited about this option! It offers such freedom to be creative and a chance to use up any leftover fabric bits and pieces. To clarify for those quilting the scrappy version of Alaska Rainbow – I am still following the pattern, I’m just simply giving myself the creative freedom to pick fabric prints and colors as I desire. That being said, once I create a block, say Block 10 for example, all three of my remaining Block 10’s

will be identical in their fabric selection and layout to the first.

This is very important to do in order to achieve a cohesively stunning and balanced quilt.

Scrappy Block 2 –  Cut your fabric using the Alaska Templates and arrange them as shown above. Continue to follow the same steps of marking, pinningsewing, and pressing as directed in the pattern to complete your blocks.

Repeat this exact color arrangement 3 more times for all four Block 2’s.

Scrappy Block 9Cut and arrange your pieces as shown then follow the steps above to complete the block. Repeat this exact color arrangement 3 more times for all four Block 9’s. For more details please visit our YouTube channel.

This has been so much fun! I can’t wait to play some more and prepare our blocks for next week! Please make sure to tag us in your progress pictures along the way at #alaskarainbowquiltalong Happy Quilting! Edyta

bottom of page